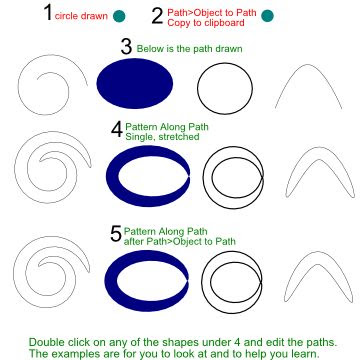
- Draw an oval, then Path>Object to Path.
- Copy the oval.
- Draw a spiral.
- Path>Path Effects to open a new menu.
- Ensure the spiral is selected before applying path effects.
- In the new menu, select Pattern Along Path.
- Click Apply. More options will be available.

- In the section pattern copies select Single, stretched.
- Next click on the icon of the clipboard.
(If nothing happens, select the oval, right click and copy. Then select the spiral and click on the clipboard icon). The oval must be copied and stored to the computer clipboard for this to work.
- The copied oval is now applied to the spiral and can be further edited at this stage.
- The spiral can be edited as normal by moving the nodes.
- After any alterations Path>Object to Path.
- Colour fill if required.
- Save.
The image below shows the sequence.
Click on image for a larger view.

The above example works for open and closed shapes, except when a square or rectangle is drawn. If you wish to use a rectangle or square apply Path>Object to Path and it will then work.
Example showing how the path effect can be edited.

My example shows an oval for shape and a spiral for the path. Other shapes and paths can be used. This is just a basic summary to show you this feature in Inkscape. Play around and you will be surprised at some of the great shapes that can be created.
Click on the image below to download a fully editable copy to have a closer look. Please let me know if it is useful and I will add an editable example with any new tutorial.
Summary
- Draw a shape and apply Path>Object to Path.
- Copy the shape. Very important or the effect will not happen.
- Draw a Path then Path>Path Effects.
- In the new menu select Pattern Along Path then click on Apply.
- In the section pattern copies, select Single, stretched.
- Click on the clipboard icon to apply the shape to the path.
- Edit shape if required.
- Path>Object to Path.
- Colour fill if required.
- Save file.
A few more examples showing different shapes and paths.

I have inkscape 0.46 on a mac running leopard but I tried this and it did not work.
ReplyDeleteI can draw the oval & the spiral but there is no apply on the object to path menu & when I click clipboard icon nothing happens.
Hi Gaz, did you copy the oval first? You copy the oval and it is stored in the computers clipboard. Then select the spiral and pattern along path, single stretched and then click on the clipboard image. If it is not in the clipboard nothing will happen. Sorry I do not know leopard operating system, but it would have a clipboard the same as windows wouldn't it? Maybe I need to rewrite the tutorial and try and explain it better.
ReplyDeleteCarolyn
I have changed the instructions to try to more clearly explain the steps.
ReplyDeleteCarolyn
Carolyn,
ReplyDeleteI did copy (edit>copy) I know that the keyboard shortcuts don't always work so I always use the menus.
Yes Leopard has a clipboard
Thanks for the re-write but it was OK as it was LOL
I shall try again when I get some spare time.
Thanks
Gaz
Hi Carolyn,
ReplyDeleteTried again, still nothing.
It is copying as I can paste the oval on the page again.
Have noticed I don't have Path>path effects
I have path>path effect editor
this brings up the menu you say but I have an ADD not an apply but it adds the effect so I get the 2nd menu you say.
it just won't apply the effect for some reason!
Oh well. Thanks for the tips anyways.
Gaz
Hi Gaz, sorry it does not work for you. Unfortunately I cannot help as I only work in windows. It may be worth visiting the Inkscape forum and asking there. The link to the forum is listed on the right side of my blog under the heading SITES WITH SVG TUTORIALS.
ReplyDeleteCarolyn
Carolyn,
ReplyDeleteseems I had something not right on my mac.
I have done a format & install of the OS (and my programs, well a few of them) and this is now working
seems the only difference in 0.47 is there is no apply (it's a plus sign & live preview is either fixed on something as there is no tick for this that I can see.
But the good news is it's Working!!
Gaz, Glad to hear you have it working. Yep, I noticed a few things are different with the new version. Fun for me, as I have a some new Cougar owners just learning Inkscape. LOL. Carolyn
ReplyDeleteHi, between you and Gaz you solved my problem also. I looked and looked for the APPLY and then I decided to check the comments and there was my answer.
ReplyDeleteI'm back at it on my Mac. I'm having problems mostly with rectangle as one path and a triangle from render/triangle to make a sawtooth border. It wants to put the rectangle on the triangle, not multiple triangles on the rectangle.
I'll keep trying.
TKS
SusanE
http://papasuecreative.blogspot.com
Hi Susan E, I tried this on my (Windows)computer and got a messy result too. I have been testing triangles on various shapes and it fails each time on a rectangle. Strange. I will keep trying and post the results.
ReplyDeleteCarolyn
Sue,
ReplyDeleteThe only way I managed to get a "saw tooth" was to use a line (not a rectangle)
I drew a triangle then
Path>object to path
I then drew a straight line (but wavy will work too) my pattern to path says I the pattern is the top object so I selected the triangle and moved it to the top of the "pile" (might be easier to draw the line then the triangle as last item drawn is the top object)
then I used
pattern along path
repeated
snake
I got a row of triangles joined to a line, I then drew an oblong, placed the triangles on top of the oblong, selected both and
Path>union
I had a saw tooth pattern
Wish I knew how to put screen grabs into posts - much easier to show than to tell LOL
GAZ, that is how I ended up doing it. Funny that line works and rectangle doesn't. I made the triangle with the star tool (3 corners) and it went on the line just fine.
ReplyDeleteLet's keep in touch since this is good stuff. Carolyn I really appreciate finding someone writing about Inkscape in "people" speak instead of "geek" speak.
I have posted your experience about this, as it may save other people the same problem.
ReplyDeleteThanks for the compliment, but I cannot take the credit. My son has learning problems and needs good visual cues. After 20 years of trying to help, it just happens to be the way I explain anything.
Carolyn
I think it won't work with rectangle as it makes the triangle the thickness of the rectangle - so it sees both parallel lines as the path.
ReplyDeleteI drew the triangle with the bezier tool and snap to grid.
Carolyn, happy to just comment on findings here LOL but if you want me to test anything to see if it's MACable (hey, new word LOL) happy to test it for you - just can't promise I'll get to it real quick LOL