Click on any image for a larger view.
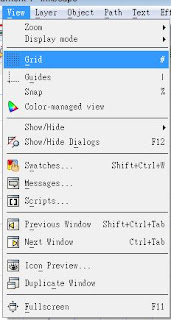
View>Grid or (# which on my keyboard is shift and 2)

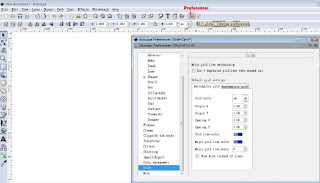
Settings for the grid can be changed in Inkscape Preferences if you would like to change the size of the grid squares.

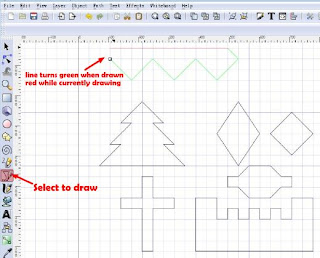
- Select the bezier tool to draw.
- Left mouse click to draw first point, release mouse button and move to next point, then left mouse click
- Repeat until the shape is complete.
- If drawing a closed shape it will close when you return to the starting point.
- Alternatively hit the return key on the computer to finish the shape.
- A line is green when drawn and red while being dragged.

- Shapes can then be colour filled.
- Select the object to be changed and select a colour from the colour bar.
- Save file.
If cutting from Sign Cut, remove either the fill or the stroke, as Sign Cut treats them as separate paths and will cut the shape twice.
Other users of Inkscape for digital cutters, save the file as normal.
Other users of Inkscape for digital cutters, save the file as normal.
Using grid to draw open shapes.
- Select the bezier tool to draw.
- Left mouse click to draw first point, release mouse button and move to next point, then left mouse click.
- Repeat until the shape is complete.
- Left mouse click to draw first point, release mouse button and move to next point, then left mouse click.
- Repeat until the shape is complete.
- Hit the return key on the computer keyboard to finish the shape.
- A line is green when drawn and red while being dragged.
To thicken the lines, path outset often give untidy results and dynamic offset rounds the corners. I do the following instead to thicken the lines.
- Open the Fill and Stroke menu.
- Select object.
- Select flat colour in the Stroke paint tab.
- Increase the Width as shown below.
- Select a style for the Join.
- Select a style for the Cap.
Below are three examples on the same object.
Many combinations can be used, select and try different options until the shape suits your requirements.
Example 1.
- After making the above changes, Path>Stroke to Path.
- Path>Simplify to remove extra nodes that are added in the process.
- Save file.
Please leave a comment if you find this useful or find it difficult to understand.


