"". Cut Two Pieces: 2009

Monday 9 November 2009

Two sets of nested shapes - Scalloped Diamond.

Two sets of nested shapes ranging in size from 2" to 5.25" in 1/4" increments. The scalloped diamonds are stacked as a nested set and both sets are on the one document. One set has a lattice oval cut out and the other set is designed as a backing mat.
I cut by colour and the shapes are nested. You may have to open them in Inkscape and resave if you are using different software.
NO LONGER AVAILABLE
- Cut out projects can be sold.
- The digital file cannot be sold. 
- Please do not repost the digital file on any other website or forum and refer people to this post to download the file.

Saturday 24 October 2009

Free files

I was bored today, so I decided to go through my folder of Inkscape files and found these two circular shapes. I cut them out and decided they might look okay if they had words embossed in the centres. I do not have many stamps and could only find a few that would fit.
Each file consists of two parts, the white part and a coloured backing mat. I cut them out 100mm (approx 4 inches) wide but they can be resized to suit your project.
NO LONGER AVAILABLE


- Cut out projects can be sold.
- The digital file cannot be sold. 
- Please do not repost the digital file on any other website or forum and refer people to this post to download the file.

Wednesday 30 September 2009

The Birthday Boy

My son Carl's medieval themed 21st party was a success. I haven't posted for a while as I was exhausted after the party and it took a week to remove all the props we used. Not to mention the two dust storms that hit Brisbane in the week we were trying to pack everything away.

I would like to thank my brother and his wife, Jayne for taking the photo's on the day. They have a Facebook page, "Photography by Jayne and Steven" as they are wedding photographers. I am sure I will be in trouble when Jayne spots this post as these are the unedited images. As soon as I get the edited images I will be making Carl an album and will post many of the files I design for free downloading.

Carl with his wooden bowl and spoon which he made us all use and cutting the cake with his version of a knife.
 
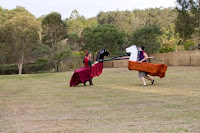
The jousting horses made out of cardboard.


Sword Fighting with swords made out of lightweight wood.


Archery.


Some of the great costumes worn to the party.
 The photographers. Jayne and Steven.

Sunday 30 August 2009

Welding Text in Inkscape

The following instructions are for owners of electronic cutters who want to weld words so they will cut out in one piece. If you only want to print the text you can skip step 5.

There are two methods that can be used to weld text in Inkscape. I am only showing how to use text kerning in this mini tutorial. As you need to use the ALT key on your computer keyboard this method is not suitable for owners of Mac computers. The big advantage of using kerning is the ability to change the font at any stage until you apply Union.

1.Type text, you will notice the cursor is at the end of the typed text, use the left arrow key on your keyboard to move the cursor to the left. Move the cursor left until it is between the first and second letters.
2. Hold down the Alt and and the letter on the right will move to the left. Keep moving the letter left until they slightly overlap.
3. Release Alt and use the right arrow to move the cursor between the next pair of letters.
4. Keep repeating steps 2 and 3 until all the letters are slightly overlapping each other.
5. Path>Union.
6. Save file.
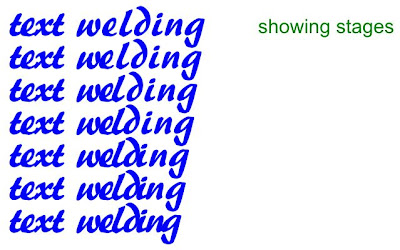
Image showing the stages of the first word. Click on image for a larger view.

Image showing the stages of the second word.
A list of the key combinations to move a letter in a given direction.
Alt and to move letter to the left.
Alt and to move letter to the right
Alt and to move the letter up
Alt and to move the letter down
To rotate individual letters place the cursor to the left of the letter you wish to move then:-
Alt and [ rotates letter anticlockwise
Alt and ] rotates letter clockwise
Ctrl and [ rotates letter 90degrees anticlockwise
Ctrl and ] rotates letter 90 degrees clockwise
The [ symbol is located to the right of P on the keyboard.

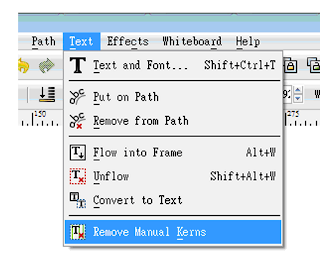
If you are not happy with the look of the word to undo all changes and return to the word prior to any kerning changes – Please note this cannot be done after applying Path>Union.
Text > Remove Manual Kerns
To view a video showing how to move individual letters there is an easy to follow video at Screencasters Heathenx and the same video is also on You Tube

Monday 27 July 2009

Pattern along Path - Single stretched.

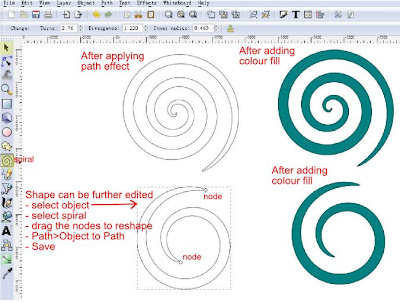
To design files for your cutter Path Effects can help you make great looking files easily. I will post a few examples and this is the first instalment. I am only showing the basics to get you started. The aim of this tutorial is to encourage you to explore Inkscape and make the most of this great free program.
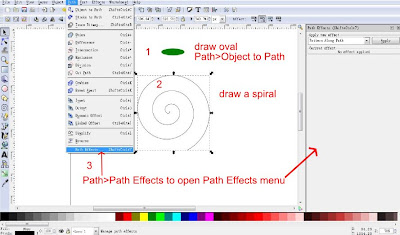
- Draw an oval, then Path>Object to Path.
- Copy the oval.
- Draw a spiral.
- Path>Path Effects to open a new menu.
- Ensure the spiral is selected before applying path effects.
- In the new menu, select Pattern Along Path.
- Click Apply. More options will be available.

- In the section pattern copies select Single, stretched.
- Next click on the icon of the clipboard.
(If nothing happens, select the oval, right click and copy. Then select the spiral and click on the clipboard icon). The oval must be copied and stored to the computer clipboard for this to work.
- The copied oval is now applied to the spiral and can be further edited at this stage.
- The spiral can be edited as normal by moving the nodes.
- After any alterations Path>Object to Path.
- Colour fill if required.
- Save.
The image below shows the sequence.
Click on image for a larger view.

The above example works for open and closed shapes, except when a square or rectangle is drawn. If you wish to use a rectangle or square apply Path>Object to Path and it will then work.
Example showing how the path effect can be edited.

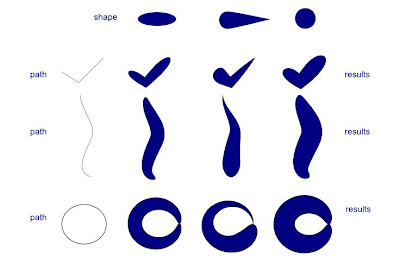
My example shows an oval for shape and a spiral for the path. Other shapes and paths can be used. This is just a basic summary to show you this feature in Inkscape. Play around and you will be surprised at some of the great shapes that can be created.

Click on the image below to download a fully editable copy to have a closer look. Please let me know if it is useful and I will add an editable example with any new tutorial.


Summary
- Draw a shape and apply Path>Object to Path.
- Copy the shape. Very important or the effect will not happen.
- Draw a Path then Path>Path Effects.
- In the new menu select Pattern Along Path then click on Apply.
- In the section pattern copies, select Single, stretched.
- Click on the clipboard icon to apply the shape to the path.
- Edit shape if required.
- Path>Object to Path.
- Colour fill if required.
- Save file.
A few more examples showing different shapes and paths.

Tuesday 21 July 2009

Inkscape - Making lacy circles

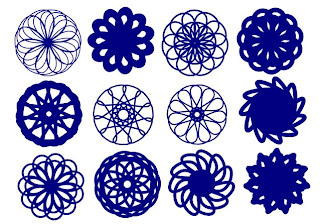
I have been having fun playing with stars in Inkscape. Below are some photo's of my cut items, they are 11.5" in diameter.


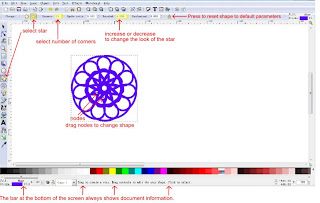
A screenshot of some of my results.
All of the images are based on an 11 point star.


A video showing how I use a star with stroke to create these designs.

Written Instructions.
To draw these shapes start by selecting star from the side menu bar.
- Draw a star and choose number of corners (my examples have 11).
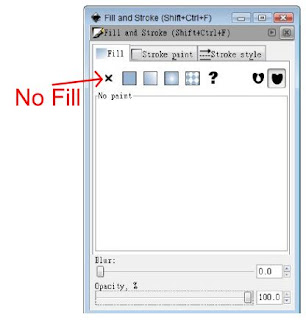
- Open Fill and Stroke and change the following settings.
- Fill > No Fill
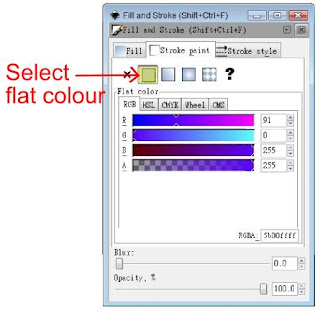
- Stroke paint > Flat colour
- Stroke style > Increase width to thicken the line.
Screenshots below showing the settings. Stroke width will vary to my setting depending on the thickness you want for your shape and the size of the star.
...


......

Now for the fun part.
- Double click on your shape and two nodes will now be visible.
- Drag the nodes to change the shape.
- To change the star further, change the number in Rounded. Rounded can be increased to 10 and decreased to -10. Location is shown on screenshot below.
- When dragging the nodes do not worry to much about the size of the shape, it can be changed later. The aim is to get a shape you like that will be suitable for cutting. I cannot give exact settings, as it varies greatly depending on the location of the nodes.
- Width of stroke can be thickened while working if you want to change the look of the shape.
- Basically drag nodes, change stroke width and change value in Rounded.
A word of warning if you like a shape save it, as it can be very hard to repeat. Duplicate the shape, move it aside and continue working on the original. I often have lots of shapes on the screen as I duplicate any suitable shape.
- After all the changes Path>Stroke to Path must be applied.
- After stroke to path is applied the shape can be saved, resized and edited as normal.
- Edit nodes. Have a look and remove any tiny clusters that will result in a pinprick size hole when cutting.
- Save file.
Click on any image for a larger view.


When I learn how to make videos I will redo this tutorial. It is very hard to show in a few images. Play around with the settings, it is easy to get great results and it is fun.
Summary
Draw a star.
Open Fill and Stroke. Turn fill off, stroke > flat colour and change stroke width.
Double click on the star and drag nodes to change the shape.
Change line width while designing shape if necessary to give a good cutting width.
Path>Stroke to Path
Resize and edit nodes.
Save file.

Great results can also be achieved by turning fill on and stroke off. The designs are entirely different. I will do a tutorial later on.

Saturday 11 July 2009

Using Grid to Draw Objects in Inkscape.

To draw objects with straight lines such as diamonds and zig zag lines, turn on the grid feature in Inkscape. The advantage of turning on the grid is the pen will follow the lines and nodes will snap to intersections on the grid enabling accurate straight lines and corners to be drawn. If the lines and nodes do not snap, just turn on snap by View>Snap. If further editing is to be done it is often necessary to turn the snap off but leave grid on.

Click on any image for a larger view.
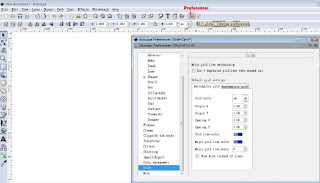
View>Grid or (# which on my keyboard is shift and 2)


Settings for the grid can be changed in Inkscape Preferences if you would like to change the size of the grid squares.


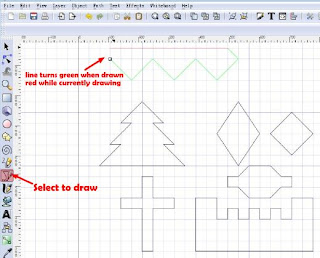
- Select the bezier tool to draw.
- Left mouse click to draw first point, release mouse button and move to next point, then left mouse click
- Repeat until the shape is complete.
- If drawing a closed shape it will close when you return to the starting point.
- Alternatively hit the return key on the computer to finish the shape.
- A line is green when drawn and red while being dragged.


- Shapes can then be colour filled.
- Select the object to be changed and select a colour from the colour bar.
- Save file.
If cutting from Sign Cut, remove either the fill or the stroke, as Sign Cut treats them as separate paths and will cut the shape twice.
Other users of Inkscape for digital cutters, save the file as normal.

Using grid to draw open shapes.
- Select the bezier tool to draw.
- Left mouse click to draw first point, release mouse button and move to next point, then left mouse click.
- Repeat until the shape is complete.
- Hit the return key on the computer keyboard to finish the shape.
- A line is green when drawn and red while being dragged.

To thicken the lines, path outset often give untidy results and dynamic offset rounds the corners. I do the following instead to thicken the lines.
- Open the Fill and Stroke menu.
- Select object.
- Select flat colour in the Stroke paint tab.

- Open the tab Stroke style.
- Increase the Width as shown below.
- Select a style for the Join.
- Select a style for the Cap.
Below are three examples on the same object.
Many combinations can be used, select and try different options until the shape suits your requirements.
Example 1.
l
Example 2.

Example 3.
- After making the above changes, Path>Stroke to Path.
- Path>Simplify to remove extra nodes that are added in the process.
- Save file.
Example showing View>Outline after all the changes.

Please leave a comment if you find this useful or find it difficult to understand.

Wednesday 10 June 2009

Inkscape -Thickening a Line

Thickening a line.
Do you find when you draw a spiral or open shape with the bezier tool that the shape closes and fills when trying to make the line thicker, like the example below? If you wish to have the line remain the same, Path>Stroke to Path, keeps the path open and does not fill with colour.
Download full article in pdf format here.


- Draw spiral or any open shape with the bezier tool.
- ensure object is selected.
- Path>Stroke to Path.
- Path>Outset. Repeat offset until it reaches the desired thickness.

Selecting multiple objects in Inkscape

Selecting multiple objects.
I use three different methods to select multiple objects. Once the objects are selected they can be edited as normal, for example grouped, combined, resized, rotated or deleted.

1. Hold down Shift key and use the mouse to click on each object to be selected.
2. Select by colour.
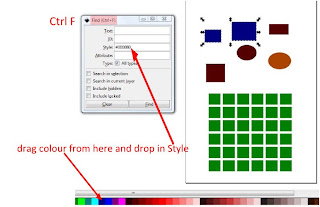
-Shift F for a new menu panel.
-drag colour selection from lower colour bar and drop into Style in the new menu panel.
- click on Find.
- All items of the selected colour are now highlighted. You may notice the colour is now a number in the style box. It changes automatically to a number when you drop the colour there from the lower colour bar.


3. Hold down the Alt key and drag mouse through items to be selected.
When Alt is held down a red line will be visible, making it easier to select the chosen path.

Sunday 7 June 2009

Thickening a Font for Digital Cutting

Do you have the perfect font but find it is too thin to be cut on a digital die cutter?

When selecting a font check first to see if bold is available, as it is often sufficient for making a font thicker. If bold is not available or is unsuitable I use three different methods depending on the font chosen. I will briefly explain each method.
Path>Outset. I use this method for square or angular fonts as it maintains sharp corners.
Path>Dynamic Offset. I use this method for curvy fonts.
Path>Linked Offset. I use this method for curvy fonts and when I want to kern text after thickening the font. This method is also great for making mats for text.


The following instructions are based on the reader having some prior knowledge using Inkscape. Experiment with each method. The following examples are only a guideline to help you learn how to thicken fonts. Click on any image below to view a larger image.

1. Path>Outset
The following example shows how to use Path>Outset. You may notice by the example the offset is dependent on the font size. If I wish to use this method I enlarge the text first, as it gives a better result. If this method is used all kerning has to be completed prior to Path>Outset.
- type text.
- enlarge font size.
- kern text (text cannot be kerned after the next step).
- Path>Outset.
- repeat Path>Outset until font is required thickness.
- resize font smaller if required.
- save file.


2. Path>Dynamic Offset
The following example shows the results using Path>Dynamic Offset.
- type text
- kern text (text cannot be kerned after the next step).
- Path>Dynamic Offset. One node will now be visible on top of the text, see image below. Very slowly drag the node upward to thicken the font. If you make the font too thick, just drag the node lower. Adjust until the font is the required thickness.
- Path>Object to Path. Alternatively Path>Union will achieve the same result.
- Save file.
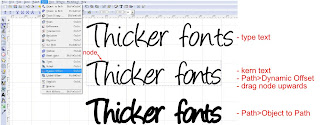
Font used above is Angelina from dafont.com

3. Path>Linked Offset.
Basic instructions for Path>Linked Offset.
- type text
- Path>Linked Offset
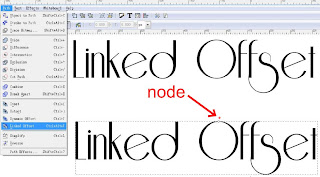
-after Path>Linked Offset I select a contrasting colour to see the changes. This step does not have to be done. I just like to have the changes more visible and it makes it easier to kern the text in the next step.
- slowly move the node upwards. I find this is very slow on my computer. If you move the node too high it can be moved lower again. Keep adjusting the node location slowly until the font is the thickness required.
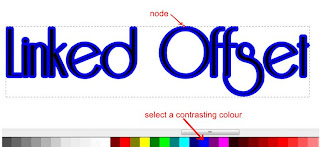

- after adjusting the thickness of the font the text can be kerned.
- ensure the text and not the offset is selected. Zoom in close to select the text only.
The linked path will move with any letter that is moved. More instructions on kerning here.
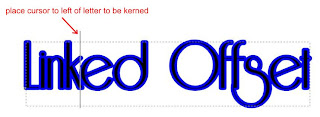
- using this method gives two objects, text and linked offset.
- select both.
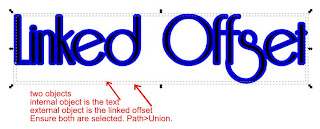

-Path>Union. The linked offset and text will now be welded together.
- Save file.
Below is a screenshot of the finished text.
Font is Riesling from dafont.com