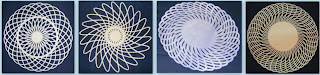
I have been having fun playing with stars in Inkscape. Below are some photo's of my cut items, they are 11.5" in diameter.
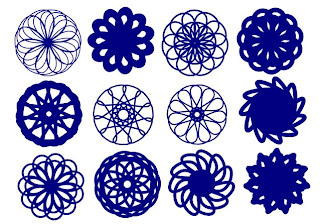
A screenshot of some of my results.
All of the images are based on an 11 point star.
A video showing how I use a star with stroke to create these designs.
- Draw a star and choose number of corners (my examples have 11).
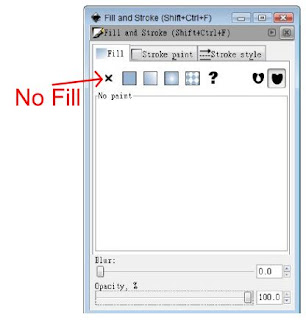
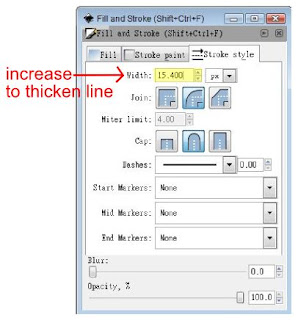
- Open Fill and Stroke and change the following settings.
- Fill > No Fill
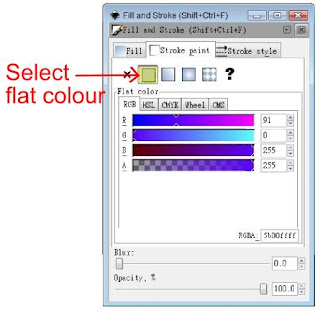
- Stroke paint > Flat colour
- Stroke style > Increase width to thicken the line.
Screenshots below showing the settings. Stroke width will vary to my setting depending on the thickness you want for your shape and the size of the star.
...
......
Now for the fun part.
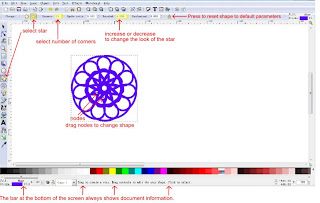
- Double click on your shape and two nodes will now be visible.
- Drag the nodes to change the shape.
- To change the star further, change the number in Rounded. Rounded can be increased to 10 and decreased to -10. Location is shown on screenshot below.
- When dragging the nodes do not worry to much about the size of the shape, it can be changed later. The aim is to get a shape you like that will be suitable for cutting. I cannot give exact settings, as it varies greatly depending on the location of the nodes.
- Width of stroke can be thickened while working if you want to change the look of the shape.
- Basically drag nodes, change stroke width and change value in Rounded.
A word of warning if you like a shape save it, as it can be very hard to repeat. Duplicate the shape, move it aside and continue working on the original. I often have lots of shapes on the screen as I duplicate any suitable shape.
- After all the changes Path>Stroke to Path must be applied.
- After stroke to path is applied the shape can be saved, resized and edited as normal.
- Edit nodes. Have a look and remove any tiny clusters that will result in a pinprick size hole when cutting.
- Save file.
Click on any image for a larger view.
When I learn how to make videos I will redo this tutorial. It is very hard to show in a few images. Play around with the settings, it is easy to get great results and it is fun.
Summary
Draw a star.
Open Fill and Stroke. Turn fill off, stroke > flat colour and change stroke width.
Double click on the star and drag nodes to change the shape.
Change line width while designing shape if necessary to give a good cutting width.
Path>Stroke to Path
Resize and edit nodes.
Save file.
Great results can also be achieved by turning fill on and stroke off. The designs are entirely different. I will do a tutorial later on.

A screenshot of some of my results.
All of the images are based on an 11 point star.

A video showing how I use a star with stroke to create these designs.
Written Instructions.
To draw these shapes start by selecting star from the side menu bar.- Draw a star and choose number of corners (my examples have 11).
- Open Fill and Stroke and change the following settings.
- Fill > No Fill
- Stroke paint > Flat colour
- Stroke style > Increase width to thicken the line.
Screenshots below showing the settings. Stroke width will vary to my setting depending on the thickness you want for your shape and the size of the star.
...


......

Now for the fun part.
- Double click on your shape and two nodes will now be visible.
- Drag the nodes to change the shape.
- To change the star further, change the number in Rounded. Rounded can be increased to 10 and decreased to -10. Location is shown on screenshot below.
- When dragging the nodes do not worry to much about the size of the shape, it can be changed later. The aim is to get a shape you like that will be suitable for cutting. I cannot give exact settings, as it varies greatly depending on the location of the nodes.
- Width of stroke can be thickened while working if you want to change the look of the shape.
- Basically drag nodes, change stroke width and change value in Rounded.
A word of warning if you like a shape save it, as it can be very hard to repeat. Duplicate the shape, move it aside and continue working on the original. I often have lots of shapes on the screen as I duplicate any suitable shape.
- After all the changes Path>Stroke to Path must be applied.
- After stroke to path is applied the shape can be saved, resized and edited as normal.
- Edit nodes. Have a look and remove any tiny clusters that will result in a pinprick size hole when cutting.
- Save file.
Click on any image for a larger view.

When I learn how to make videos I will redo this tutorial. It is very hard to show in a few images. Play around with the settings, it is easy to get great results and it is fun.
Summary
Draw a star.
Open Fill and Stroke. Turn fill off, stroke > flat colour and change stroke width.
Double click on the star and drag nodes to change the shape.
Change line width while designing shape if necessary to give a good cutting width.
Path>Stroke to Path
Resize and edit nodes.
Save file.
Great results can also be achieved by turning fill on and stroke off. The designs are entirely different. I will do a tutorial later on.


